Table of contents
ToggleWhat are microgreens?
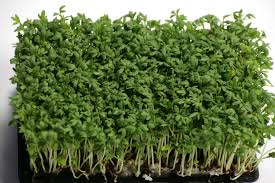
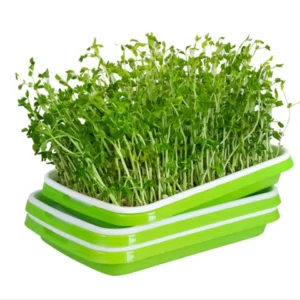
Microgreens are small and nutritious vegetables that can be grown in a container or tray on your kitchen counter.
They are also called "true superfoods" because they contain more nutrients than their mature counterparts. Microgreens are a great addition to any diet. They are tasty, nutritious and an easy way to add more greens to your diet.
Microgreens may resemble plant sprouts such as beans or alfalfa, but they are grown in very different ways.
Growing those little healthy sprouts isn't difficult, but there are some tricks to getting the most out of your harvest. This article gives you advice and tips to grow microgreens and be successful.
Microgreens contain more nutrients per 100g than adult vegetables, how much more depends on the microgreen in question, but you can read more about the nutritional content in this link broccoli microgreens.
Microgreens are easy to grow
Microgreens can be grown all year round. You rinse the seeds you want to use.
When they germinate, they grow and then you need to rinse them twice a day in cold water.
After 2-5 days, the sprouts are ready to use.
NB. 2-3 times a day the sprouts should be rinsed. This is to prevent them from drying out. It is recommended to set an alarm twice a day, e.g. morning and evening

Checklist for growing microgreens
- A hill
- Organic seeds
- Light
- Gromedie
Guide to cultivation
Here's our guide to growing microgreens of different varieties:
Start by preparing your chosen tray with well-moistened growing medium. It should be wet, but not so wet that it would drip if you took it out of the tray - now you're ready to sow your seeds, again remember that seeds produced for microgreens are important to avoid chemicals and toxins in your microgreens.
In the list below we've written about the most common microgreen varieties, all of which are ultra healthy and easy to grow yourself. The time they can be harvested varies a lot - depending on how big you want them - we always advise you to taste them along the way. They change flavour quickly as they grow, so you need to find the size where you like them best.
- Chia – has a slightly bitter taste, germinates after 4-6 days and can be harvested approx. after 10-20 days – chia microgreens can be harvested once, they do not grow further after harvest.
- Arugula – tastes a bit like pepper, germinates after 3-5 days and is harvested after 10-14 days – harvested once.
- Broccoli - has a mild taste of broccoli, sprouts after 2-3 days and can be harvested after approx. 5 days as sprouts or after 12-14 days as microgreens - harvested once.
- Sunflower – tastes slightly sweet and mildly nutty, soaked for a day before sowing, sprouts after 3-4 days and harvested after 8-14 days – harvested once.
- Microclover – Sweet, mild and fresh nutty taste, germinates after 4-5 days and is harvested after 9-11 days, can be harvested once.
- Peas – has a mild taste of peas, is soaked before sowing, germinates after 2-3 days and can be harvested after 14-20 days – peas can be harvested more than once, in our experiments we harvested 3 microgreens from the same seed – here fertilizer starts to become important, we recommend that you add a little liquid fertilizer to the water after the first harvest.
Common to large seeds. Peas and sunflowers can be soaked the day before sowing.
They will germinate quickly. Smaller seeds are not necessary as they will quickly absorb water. You won't save any germination time by soaking them.
How can I grow microgreens?

Microgreens can be grown at home with minimal effort and equipment. It's super easy to get started and you can grow fresh, crisp and flavoursome microgreens all year round - as long as you have plenty of light and normal room temperature.
You can also grow outdoors when the weather is warm and sunny, but with outdoor cultivation, problems with pests such as e.g. snails that eat your newly sprouted micro-vegetables.
You get fresh microgreens that can be eaten in salads, sandwiches, smoothies or as a garnish, adding flavour and health to your meals.
It takes a little space in your home and effort on your part, but the reward is fresh plants in the end
FAQ - Frequently asked questions
Microgreens are small young plants that are harvested shortly after germination.
They are known for their high nutritional content and intense flavour. They are grown from a variety of vegetable, herb and cereal seeds and are often used as flavourful and decorative garnishes in various dishes.
when growing microgreens. Sow the seeds evenly in a container with moist soil, cover lightly and keep the soil moist. Place the container in an area with good lighting and wait for the shoots to germinate, which usually takes about one to three weeks.
Microgreens such as chia, rocket, broccoli, sunflower, microclover and peas can be grown in the ground by sowing the seeds, keeping them moist and giving them plenty of light. Microgreens can vary in flavour and nutritional content and can add flavour and nutrition to your dishes.
Microgreens are high in vitamins, minerals and antioxidants, which can reduce the risk of diseases such as cardiovascular disease and cancer. They contain more nutrients per unit weight compared to full-grown vegetables. Their high fibre content promotes good digestion and can help with weight management. Microgreens also have potential anti-inflammatory properties that can be beneficial for those with inflammatory conditions.
Yes, cress is a microgreen that is easy to grow. It's a fine sprout with green leaves and a sharp peppery flavour.
Links to other guides from some of our colleagues
Ultimate microgreens guide from our colleague (English article)
- Read it click here


