Growing sprouts in sprouting jars is a great way to add nutrition and freshness to your meals. It requires minimal space, is economical and can be done all year round. Have fun with your sprout growing!
Get a deeper insight into how you can use sprouting jars to grow nutritious sprouts at home with minimal effort. With simple steps and daily rinsing, you can turn dry seeds into crispy sprouts in under a week.
This method not only requires little counter space, but is also a great way to add a fresh, home-grown touch to salads, sandwiches and many other dishes.
What is a sprout glass?
One seedling glass is a simple tool for growing sprouts from different types of seeds, peas and beans at home.
It consists of a glass with a lid. It either has small holes or is equipped with a net.
The holes allow water to drain away while ensuring sufficient air circulation for the sprouts.

How does a spireglass work
A sprout jar is a simple tool for growing edible sprouts from seeds such as alfalfa, beans, lentils, chickpeas and many more. Sprouts are popular for their nutritional value and usefulness in salads, sandwiches and other dishes.
Here is a basic guide to how a sprout glass works:
1. Preparing the seeds: You start by placing a small amount of seeds in the germination jar. The seeds need to soak in water for several hours or overnight to begin the germination process.
It helps to awaken the seeds from their dormant state and promote germination.
2. Drainage of water: After initial soaking, drain the water from the glass.
The germination jar is usually equipped with a lid. It has small holes or a net that allows the water to drain without the seeds falling out. This is important to prevent the seeds from getting too wet and starting to rot.
3. Flushing and draining: Two to three times a day, rinse the seeds with fresh water and then drain. This is necessary to keep the seeds moist and clean them of any bacteria or mould that may develop. Proper air circulation is also important, which is achieved through the regular rinsing and draining.
4. location: Between rinses, store the sprout jar in a place with indirect sunlight and good air circulation. Direct sunlight can be too strong and damage the delicate sprouts, while insufficient air can promote mould growth.
5. Harvest: Depending on the type of seed, the sprouts can be ready for harvest within 3-7 days. Once the sprouts have reached the desired size, they are rinsed one last time, drained well and can then be eaten or stored in the fridge for a short period.
Sprouting jars are an easy and space-saving way to grow sprouts at home. It requires minimal equipment and provides a fresh source of nutrition and flavour for your meals.
Advantages and disadvantages of using sprouted glass
| Advantage | Disadvantage |
|---|---|
| Easy to use | Regular rinsing |
| Optimal air circulation | Limited space |
| Good drainage | Time-consuming monitoring |
| Controlled adult environment | Risk of contamination |
| Transparency | Requires good hygiene |
| Environmentally friendly |
High water consumption |
| Economic | |
| Healthy |
Which seeds are best to grow in germination jars
There is a difference between large and small seeds when growing in germination jars.
We recommend growing large seeds in the germination jar as small seeds tend to clump together in the jar.
Large seeds can be, for example:
Lenses,
Peas,
Prayers.
For growing small seeds, we recommend growing them as microgreens, as this is an easier and better process and prevents the small seeds from clumping together in the jar.
Small seeds can be, for example:
By growing small seeds that micro green in a tray with soil, you ensure that each tiny seed has enough space to germinate and grow without being disturbed by the other seeds and clumping together.
The method promotes healthy growth and ensures that plants have optimal access to light, water and nutrients. Microgreens also require less space than traditional growing methods, making it an ideal solution for those who may not have a lot of space, such as in an urban environment or in a small apartment.
Growing microgreens is not only convenient, but it's also a quick process. Most microgreens can be harvested within a few weeks of sowing, providing a quick and nutritious addition to meals.
Moreover, microgreens are known for their high vitamin, mineral and antioxidant content, making them a superfood that can improve your daily dietary intake.
- Read more about microgreens here
A little about grow lights (grolys):
To support the growth of both large seeds in sprouting glass and small seeds grown as microgreens, the use of Grow lights (grolys) be a decisive factor. Especially in environments with limited natural light.
Grow lights simulate sunlight, which is essential for plant photosynthesis and overall growth.
Using grow lights ensures that plants receive the necessary amount of light to optimise their growth, regardless of the season or indoor location.
This is especially important for micro greenwhich require good lighting to fully develop and achieve a high level of nutrients.
Grow lights allow you to precisely control light conditions, which can improve the germination process and accelerate growth, allowing you to harvest your microgreens and sprouts faster.

How to grow your own sprouts
Growing your own sprouts is a simple and rewarding process that can be done indoors all year round.
Sprouts are small shoots from seeds such as beans, lentils, alfalfa and many others. They are packed with nutrients. Here is a step-by-step guide to growing your own sprouts:
You'll need:
- Seeds suitable for germination (make sure to buy seeds that are intended for germination to avoid the risk of bacteria build-up).
- A sprout hill
- Fresh water
Course of action:
1. clean your seeds: Start by rinsing your seeds thoroughly in cold water to remove any dust or dirt.
2. Bleeding: Place the seeds in the germination jar and cover them with plenty of water.
Let them soak overnight or according to the specific instructions for the seeds you are using. This step will help bring the seeds to life.
3. Drainage: After soaking, drain the water from the glass. You can put it on and turn the jar upside down to let the water drain. Make sure the seeds are well drained to avoid mould or bacterial growth.
4. Flushing and draining: Rinse your seeds at least twice a day with fresh water and drain them thoroughly each time. This keeps the seeds moist and prevents them from rotting.
5. location: Place the sprout jar in a place with indirect light and at room temperature. Direct sunlight is not necessary and can actually damage the delicate sprouts.
6. Waiting time: Depending on the type of seed, you will start to see sprouts within a few days to a week. Continue to rinse and drain the seeds twice daily.
7. Harvest: When the sprouts have reached the desired length, which is typically a few centimetres, they are ready to harvest. Rinse them one last time and let them drain well.
8. Storage: Store your fresh sprouts in the fridge. They will stay fresh for several days, depending on the type of sprouts.
Tips:
Hygiene: Make sure to keep all tools and your work surface clean to avoid bacterial growth.
Sort: Experiment with different types of seeds to find your favourites.
Use: Sprouts are great in salads, sandwiches, as a topping for soups and in wok dishes.
Growing your own sprouts is not only fun, but also a great way to add extra nutrition to your daily diet. Have fun with your sprout growing!
Covering sprout glass
Covering a germination tube with a black bag is a technique sometimes used to create a dark environment. It can favour the growth of certain types of sprouts. The darkness mimics the darkness of the soil and encourages faster germination for some seed types.
Here are some considerations and steps to take if you choose to use a black bag for covering:
Purpose of Blackout
- Promote germination: Some seeds germinate better in the dark as it mimics the natural conditions underground.
- Stimulate root growthDarkness can stimulate stronger root growth before the green parts start to develop.
- Avoid algae growth: Light can promote the growth of algae on seeds and in the germination environment. By using a black bag, you can reduce the amount of light and thus the risk of algae growth.

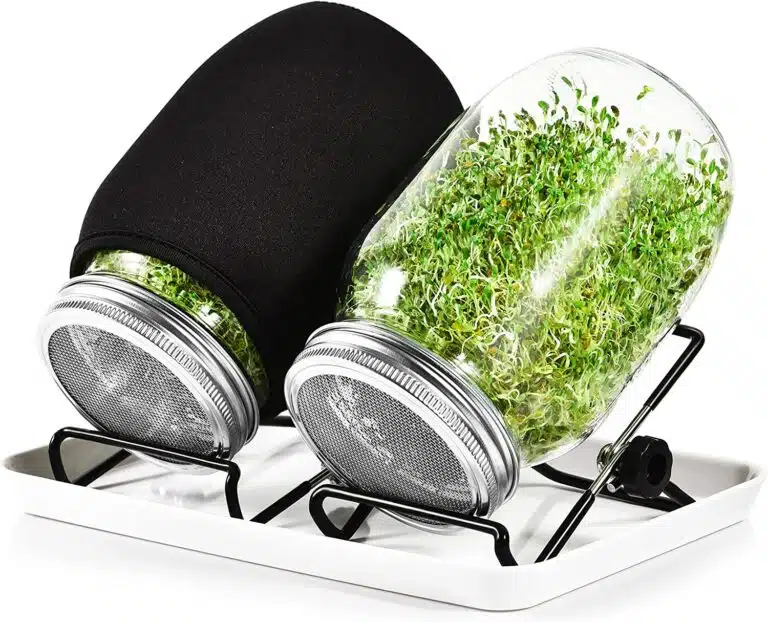
Create a good growth - use the included holder for your sprouting glass
Having a holder for your sprout jar can make the process of growing sprouts at home much easier and more organised.
A holder helps maintain the correct drainage angle of the glass, ensuring good air circulation around the seeds. It can help keep your kitchen clean and tidy.
There are different options for creating or purchasing a holder for the spire glass, We recommend our package solution for sprouting glass.
Manufactured holders
- Customised Spire Glass Holders: There are holders designed specifically for spire glass. These are often adjustable and can hold the glass at the perfect angle for drainage.
Important considerations
- Angle for Drainage: The ideal holder will hold the glass at an angle that allows the water to drain freely while keeping the seeds moist but not wet.
- Stability: Make sure the holder is stable and cannot easily tip over, as this can scatter the seeds or damage the growing sprouts.
- MaterialsChoose materials that won't rust or degrade easily in a humid environment. Stainless steel, plastic or treated wood are good choices.
Investing in the right holder for your sprout jar can significantly improve your results when growing sprouts.
A good holder will not only make it easier to handle daily rinses and drains, but also help ensure that your sprouts grow healthy and strong.

FAQ - Frequently Asked Questions
Glass sprouting offers a clean, simple and visually appealing way to grow nutritious sprouts. It allows for easy observation and control of the sprouting process, ensures good air circulation, and promotes efficient drainage, which is crucial to avoid mould and rot. Furthermore, glass is a non-porous material that doesn't absorb odours or promote bacterial growth, making it a hygienic choice for sprouting.
Covering the sprouting glass with a breathable material, such as gauze or cheesecloth, secured with an elastic band, ensures optimal air circulation and moisture control. This promotes a healthy germination process by effectively allowing water to drain away, while protecting against pests and preventing seeds from washing out during watering.
A sprouting glass holder ensures that the glass maintains the ideal angle for water drainage and air circulation, which is essential for healthy sprouts. It stabilises the glass and frees up counter space, making the sprouting process both more organised and hygienic.
